Component State
This blog is in continuation with the last blog on React.
Component helper functions
Let's go back to working with React.
We start with a new example:
const Hello = (props) => {
  return (
    <div>
      <p>
        Hello {props.name}, you are {props.age} years old
      </p>
    </div>
  )
}

const App = () => {
  const name = 'Peter'
  const age = 10

  return (
    <div>
      <h1>Greetings</h1>
      <Hello name="Maya" age={26 + 10} />
      <Hello name={name} age={age} />
    </div>
  )
}
Let's expand our Hello component so that it guesses the year of birth of the person being greeted:
const Hello = (props) => {
  const bornYear = () => {
    const yearNow = new Date().getFullYear()
    return yearNow - props.age  }

  return (
    <div>
      <p>
        Hello {props.name}, you are {props.age} years old
      </p>
      <p>So you were probably born in {bornYear()}</p>    </div>
  )
}
The logic for guessing the year of birth is separated into a function of its own that is called when the component is rendered.
The person's age does not have to be passed as a parameter to the function, since it can directly access all props that are passed to the component.
If we examine our current code closely, we'll notice that the helper function is defined inside of another function that defines the behavior of our component. In Java programming, defining a function inside another one is complex and cumbersome, so not all that common. In JavaScript, however, defining functions within functions is a commonly-used technique.
Destructuring
Destructuring makes the assignment of variables even easier since we can use it to extract and gather the values of an object's properties into separate variables:
const Hello = (props) => {
  const { name, age } = props
  const bornYear = () => new Date().getFullYear() - age

  return (
    <div>
      <p>Hello {name}, you are {age} years old</p>
      <p>So you were probably born in {bornYear()}</p>
    </div>
  )
}
If the object we are destructuring has the values
props = {
  name: 'Arto Hellas',
  age: 35,
}
the expression const { name, age } = props assigns the values 'Arto Hellas' to name and 35 to age.
We can take destructuring a step further:
const Hello = ({ name, age }) => {
  const bornYear = () => new Date().getFullYear() - age

  return (
    <div>
      <p>
        Hello {name}, you are {age} years old
      </p>
      <p>So you were probably born in {bornYear()}</p>
    </div>
  )
}
The props that are passed to the component are now directly destructured into the variables, name and age.
This means that instead of assigning the entire props object into a variable called props and then assigning its properties to the variables name and age
const Hello = (props) => {
  const { name, age } = props
we assign the values of the properties directly to variables by destructuring the props object that is passed to the component function as a parameter:
const Hello = ({ name, age }) => {
Stateful component
All of our components up till now have been simple in the sense that they have not contained any state that could change during the lifecycle of the component.
Next, let's add state to our application's App component with the help of React's state hook.
App.js changes to the following:
import { useState } from 'react'
const App = () => {
  const [ counter, setCounter ] = useState(0)
  setTimeout(    () =>
    setCounter(counter + 1),    1000  )
  return (
    <div>{counter}</div>
  )
}

export default App
In the first row, the file imports the useState function:
import { useState } from 'react'copy
The function body that defines the component begins with the function call:
const [ counter, setCounter ] = useState(0)
The function call adds a state to the component and renders it initialized with the value of zero. The function returns an array that contains two items. We assign the items to the variables counter and setCounter by using the destructuring assignment syntax shown earlier.
The counter variable is assigned the initial value of state which is zero. The variable setCounter is assigned a function that will be used to modify the state.
The application calls the setTimeout function and passes it two parameters: a function to increment the counter state and a timeout of one second:
setTimeout(
  () => setCounter(counter + 1),
  1000
)
The function passed as the first parameter to the setTimeout function is invoked one second after calling the setTimeout function
() => setCounter(counter + 1)
When the state modifying function setCounter is called, React re-renders the component which means that the function body of the component function gets re-executed:
() => {
  const [ counter, setCounter ] = useState(0)

  setTimeout(
    () => setCounter(counter + 1),
    1000
  )

  return (
    <div>{counter}</div>
  )
}
The second time the component function is executed it calls the useState function and returns the new value of the state: 1. Executing the function body again also makes a new function call to setTimeout, which executes the one-second timeout and increments the counter state again. Because the value of the counter variable is 1, incrementing the value by 1 is essentially the same as an expression setting the value of counter to 2.
() => setCounter(2)
Meanwhile, the old value of counter - "1" - is rendered to the screen.
Every time the setCounter modifies the state it causes the component to re-render. The value of the state will be incremented again after one second, and this will continue to repeat for as long as the application is running.
If the component doesn't render when you think it should, or if it renders at the "wrong time", you can debug the application by logging the values of the component's variables to the console. If we make the following additions to our code:
const App = () => {
  const [ counter, setCounter ] = useState(0)

  setTimeout(
    () => setCounter(counter + 1),
    1000
  )

  console.log('rendering...', counter)
  return (
    <div>{counter}</div>
  )
}
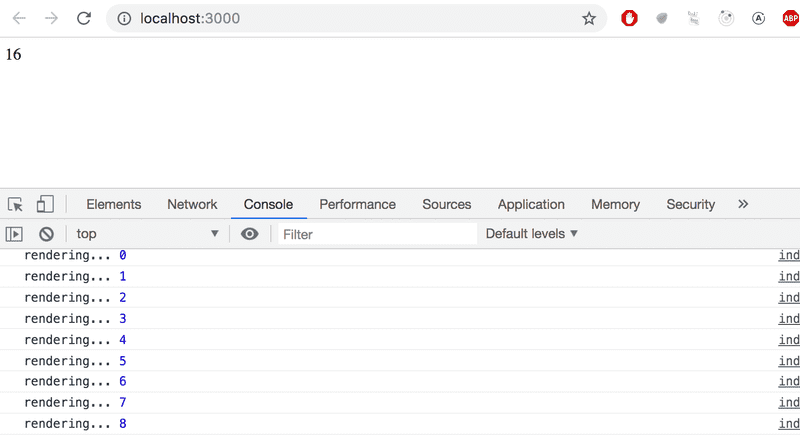
It's easy to follow and track the calls made to the App component's render function:

Was your browser console open? If it wasn't, then promise that this was the last time you need to be reminded about it.
Event handling
A user's interaction with the different elements of a web page can cause a collection of various kinds of events to be triggered.
Let's change the application so that increasing the counter happens when a user clicks a button, which is implemented with the button element.
Button elements support so-called mouse events, of which click is the most common event. The click event on a button can also be triggered with the keyboard or a touch screen despite the name mouse event.
In React, registering an event handler function to the click event happens like this:
const App = () => {
  const [ counter, setCounter ] = useState(0)

  const handleClick = () => {
    console.log('clicked')
    }

  return (
    <div>
      <div>{counter}</div>
      <button onClick={handleClick}> plus </button>
    </div>
  )
}
We set the value of the button's onClick attribute to be a reference to the handleClick function defined in the code.
Now every click of the plus button causes the handleClick function to be called, meaning that every click event will log a clicked message to the browser console.
The event handler function can also be defined directly in the value assignment of the onClick-attribute:
const App = () => {
  const [ counter, setCounter ] = useState(0)

  return (
    <div>
      <div>{counter}</div>
      <button onClick={() => console.log('clicked')}>
        plus
      </button>
    </div>
  )
}
By changing the event handler to the following form
<button onClick={() => setCounter(counter + 1)}>
  plus
</button>
we achieve the desired behavior, meaning that the value of counter is increased by one and the component gets re-rendered.
Let's also add a button for resetting the counter:
const App = () => {
  const [ counter, setCounter ] = useState(0)

  return (
    <div>
      <div>{counter}</div>
      <button onClick={() => setCounter(counter + 1)}>
        plus
      </button>
      <button onClick={() => setCounter(0)}> zero </button>
    </div>
  )
}
We define the event handlers for our buttons where we declare their onClick attributes:
<button onClick={() => setCounter(counter + 1)}>
  plus
</button>
What if we tried to define the event handlers in a simpler form?
<button onClick={setCounter(counter + 1)}>
  plus
</button>
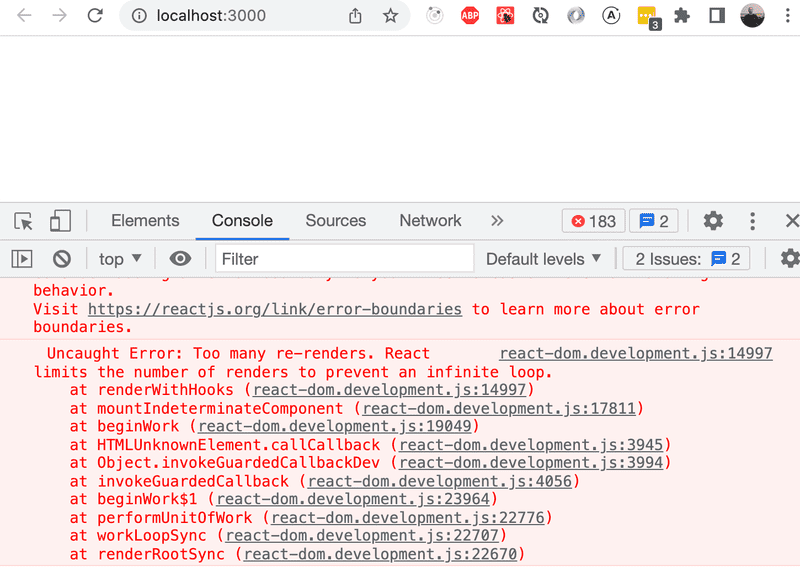
This would completely break our application:

What's going on? An event handler is supposed to be either a function or a function reference, and when we write:
<button onClick={setCounter(counter + 1)}>
the event handler is actually a function call. In many situations this is ok, but not in this particular situation. In the beginning, the value of the counter variable is 0. When React renders the component for the first time, it executes the function call setCounter(0+1), and changes the value of the component's state to 1. This will cause the component to be re-rendered, React will execute the setCounter function call again, and the state will change leading to another rerender...
Let's define the event handlers like we did before:
<button onClick={() => setCounter(counter + 1)}>
  plus
</button>
Now the button's attribute which defines what happens when the button is clicked - onClick - has the value () => setCounter(counter + 1). The setCounter function is called only when a user clicks the button.
Let's separate the event handlers into separate functions anyway:
const App = () => {
  const [ counter, setCounter ] = useState(0)

  const increaseByOne = () => setCounter(counter + 1)
  const setToZero = () => setCounter(0)
  return (
    <div>
      <div>{counter}</div>
      <button onClick={increaseByOne}> plus
      </button>
      <button onClick={setToZero}> zero
      </button>
    </div>
  )
}
Here, the event handlers have been defined correctly. The value of the onClick attribute is a variable containing a reference to a function:
<button onClick={increaseByOne}>
  plus
</button>
The internet is full of React-related material.
You may find the following links useful:
The official React documentation is worth checking out.
Some courses on Egghead.io like Start Learning React are of high quality, and the recently updated Beginner's Guide to React is also relatively good.
There are millions of courses online free as well as paid courses you can follow anyone of the course to go to the advanced level.
The objective of these blogs was just to give you the basic idea and feel to get started with your react journey especially if you are just starting.
Remember, this is just the beginning of your journey with React. There's so much more to explore, from state management and React hooks to advanced concepts like server-side rendering and React context.
As you continue your learning adventure, embrace the challenges and keep building exciting projects. Don't be afraid to experiment, as it's through experimentation that we truly grow as developers.
Always stay curious and seek knowledge from the vast React community and the ever-evolving web development ecosystem. Keep an eye on the latest best practices and techniques, and don't hesitate to share your discoveries with others.
We will learn more about react in coming blogs, will try to use different tools and technologies with react so stay tuned!!!
